Fibreglass Pond Construction
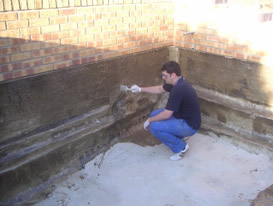
A pond is constructed with a reinforced concrete base and with reinforced concrete block walls, and is rendered to provide a flat surface for the fibreglass to be laminated onto. The corners within the pond should be given a slight radius so that the fibreglass sits properly, and the surfaces should be checked to make sure that they are free from sharp points and lumps will make it much more difficult to lay the fibreglass matting onto.
When all the structural work is completed, the render is left to dry out completely, it is a good idea to use some sort of covering to put over the pond to protect the render from further water absorption if any bad weather occurs, make sure you plan your work within a dry weather spell, do not attempt to fiberglass in colder or damp climates as this will inhibate curing process, if you are unsure please ask.
Before starting please ensure that you read all health and safety advice labels on the materials you use, protective clothing should be worn such as overalls, rubber gloves, goggles and dust masks for sanding.
Plan your course of lay-up before starting, if you are working on a deep pond, leave a dry section to climb in and out from and finish this area last.
Lay-up outer walls first coming down 3 – 4 “ onto floor space, when walls are cured finish with floor, coming back over the overlap onto, this prevents any damage to floor lay-up when moving around your pond. Leave these layers to cure.
Once the render is complete and dry you will be in a position to start work.
Apply a coat of G4, not only to seal the cement render but also to provide a bonding primer for the polyester resin. Its use as a sealer is to prevent any residual moisture and alkali present in the cement render from affecting the polyester resin. Polyester resins are not adhesives, and whilst they do (or do not) bond to many substrates G4 increases the adhesion due to its chemical similarity. However whilst applying G4 is by far the better system, many ponds have been constructed successfully without, simply using catalyzed resin thinned with styrene to seal the porosity in the render. This is purely your choice dependent upon your budget.
Once the G4 sealer has cured, within 4 hours applying (tacky to touch), layers of 450 c.s.m. can be applied, best cut one meter square pieces before you start to make the lay-up process easier to handle and don’t mix more resin than you need at once about 2 - 4 kg at a time is normally a good workable amount.
The usual amount of catalyst added resin is 1 - 2% depending on the temperature you are working in, if you find the resin is curing to fast due to hot weather, cut down the amount of catalyst accordingly, never go less than 1% as curing will not take place effectively.
After mixing catalyst thoroughly into resin, paint a coat onto working area then place fibreglass matting over, then paint resin over, using a paddle roller, roll over area, flattening matting and eliminating any air pockets, stipple any rouge strands into place. Apply first layer over surface overlapping each layer by approximately 3 inches, then apply second layer again with 3 inches over-lap but stagger the joints away from that of the first application, best method is applying wet-on-wet, if you do leave laminate for more than 24 hours make sure you abrade and wipe with acetone to sensitize surface.
When the layers of 450g matting and resin have cured, sand down any rough or sharp protrusions and check for dry mat or gaps, once any defects are removed or repaired wipe with acetone then apply a layer of surface tissue, this gives a smooth even finish onto the course fibrous chopped strand matting and creates a good surface for applying the flowcoat.
Once the tissue and resin have cured, check for any dry patches within laminate, if you are satisfied with your work sand lightly and wipe with acetone prior to applying the flowcoat finish, again only mix a workable amount at one time (2 - 4 kg) and add 2% catalyst. Make sure you apply at recommended thickness of .4-.6mm thick, do not spread too thin, basically 1 Kg of Flowcoat should spread 1.5 sq mt.
It is highly important that you mix the main tin for a good 10mins or more prior to decanting batches to ensure the wax in the flowcoat has not separated whilst in transit or when stored. Although some suppliers and video guides out there show flowcoat being applied by roller, we only recommend applying ours by brush. If the flowcoat is applied too thin, the coat will not be thick enough to hold enough wax content therefore you will end up with tacky areas, our flowcoat is a BRUSH flowcoat.
Do NOT apply multiple layers of flowcoat as it will not allow secondary bonds, always apply a good liberal coat first time.
You can choose from a wide variety of colours, most common is British racing green for a more natural feel, black is a good colour for quite shallow nature ponds as it gives the illusion of depth.
The resins and flow coat, although may seem dry at touch, are still going through the curing process so leave for 2 weeks minimum before filling with water, as polyester resins contains around 35% styrene monomer which can, unless the laminate is properly cured have a toxic effect on fish. It is advisable to fill and empty the pond with water several times to bring out any toxins present. Introduce plant life first, a few weeks later if all looks well introduce the fish.

This advice and information is given in good faith for guidance only. and is given without warranty, users should determine information given and using their own judgment to determine suitability.
To reassure our customers - all materials supplied by East Coast Fibreglass Supplies are of the finest quality, manufactured by companies such as Scott Bader, DSM, Owens Corning to name but a few, who all have supplied materials into the Composites industry for many years on a global scale. Samples from every batch manufactured are retained for testing, should the need arise.