Craft Guide

Resin & Glassfibre
The combination of polyester resin and glassfibre provides an incredibly versatile material -strong, durable, weatherproof, waterproof, non-rusting, easily moulded to virtually any shape or size, and highly adhesive to a wide range of materials, enabling it to be used both as a repair material and as a constructional material. For the sculptor, model-maker and craft-worker, it offers considerable scope as a viable alternative to traditional products such as metal or wood. In many cases, it may be a more appropriate choice, being either more economical or easier to use. Cold-cure "bronze" casting, for example, offers the sculptor a much easier and cheaper process than traditional foundry work.
The range of items which can be made with these materials is almost unlimited - costume jewellery, chess sets, model figures and vehicles, replica armour, relief maps, theatrical props and scenery, landscapes for war games or model railways, relief panels, and all types of sculpture are just some examples. The polyester resin widely used in GRP (it stands for Glassfibre Reinforced Plastic), is a viscous liquid which, when activated by a suitable catalyst (hardener), sets to a hard, rigid plastic. Like all liquids, it naturally adopts the shape of its container - hence it can be poured or painted into a mould, and, once cured, will reproduce the shape of the mould.
The resin can therefore be used to make castings which accurately reproduce the finest detail of the mould. It can be mixed with a variety of fillers, including metal powders to create realistic imitation metal castings. The casting can be painted, or it can be self-coloured (easily achieved by pigmenting the resin with special pastes, available in a wide range of colours). Unlike most other plastics, such as polythenes and polypropylenes, polyester resins cure at room temperature and can be easily used in the home, school or small workshop. The resin can be used on its own to make small castings, but the hardened plastic is fairly brittle so, for larger items, fibreglass materials are added to give greatly increased strength. A laminate of fiberglass layers impregnated with resin has considerable strength in relation to its weight, making it suitable for structures of virtually any size.
Although resin and glassfibre can be used in a variety of ways, many of these are simply variations or permutations of basic methods. This handbook describes the basic techniques, covering a comprehensive selection of casting and laminating applications - the imaginative user will soon find ways to develop appropriate variations to suit specific projects.
Getting Started
One of the advantages of GRP is that you can start a project with very little in the way of tools, equipment and workshop facilities. In fine weather, many projects can be carried out in the open air - in which case, no workshop is needed at all! The only equipment required for most laminating projects is a few brushes, laminating rollers and plastic buckets! Even less equipment is needed for casting - for some projects, you will need nothing more than a plastic cup in which to mix the resin! This contrasts sharply with the amount (and cost!) of equipment needed to work with wood, metal, sheet plastic and other construction materials. Since the initial investment in facilities and tools is so low, GRP is practicable both for one-off jobs, such as the production of an engineering prototype or a large sculpture, and for "cottage industry" manufacture of craft items.
The main cost is that of materials - but the cost is not as high as it may at first appear. Resin, for example, may seem expensive when compared with paints or varnishes - but it is important to remember that resins for GRP are not coating materials like paints, but structural materials, like timber or metal, and the cost should be assessed accordingly.
WORKING AREA
A suitable workshop is easily arranged - the only requirements are that it should have enough space, and should be warm and adequately ventilated. Ideally, the room temperature should be about 20°C, as this ensures that the resin will cure correctly. Resins will not cure adequately below 15°C, and at temperatures above 30°C, they will cure so quickly you will hardly have time to use them! Because some of the materials are inflammable, you must not use oil heaters or electric fires, so, if the workshop does not have central heating, maintain the temperature with convector heaters, "Dimplex" radiators, or similar. The room must be well ventilated, for some materials produce fumes which can be distressing in heavy concentrations - for example, the styrene given off by the resin whilst curing (although this problem can be alleviated by using Resin E, a general purpose resin with reduced emission of styrene). These problems can be avoided altogether in warm weather, when it is perfectly possible to work outdoors, but do make provisions for protecting the project from rain -moisture will prevent the resin from curing.
You will need a suitable work surface. For small jobs, of course, you can use a normal workbench or trestle table. Protect it from resins and other materials by covering it with polythene, Polyester Film or brown wrapping paper. Larger projects may call for trestles to support the mould at a convenient height. Your workshop will need very little equipment, the following tools and accessories being adequate for most projects:
Plastic Cups, Buckets/Mixing Sticks: These will be needed for all projects, for mixing resins, pigments, fillers, etc. Do not use polystyrene cups - they are dissolved by the resin! Ideally, use purpose-made calibrated plastic cups - these can be used for measuring as well as mixing. Catalyst dispenser: No dispenser is needed for paste catalyst, but a purpose-made safety dispenser is essential for measuring out liquid catalyst. For small amounts, a measuring syringe can be used. Plastic Gloves:
You should wear plastic gloves when handling resins or glassfibre. Disposable polythene or rubber gloves are readily available, very cheap and convenient to use. Those with particularly sensitive skin should wear Barrier Cream as well as gloves. Brushes and Rollers: For applying resin, especially when laminating (not required for many small casting applications). Use tools specifically made for GRP -conventional decorator's tools often use adhesives which are attacked by the resin. Metal rollers:
Only needed for laminating - used to consolidate the resin/glassfibre layers.
MATERIALS:
A wide range of materials are available for use in various casting and laminating applications, including some required only for specialised uses. A comprehensive selection is described in some detail in Appendix 1. The following products are those most likely to be required for the majority of applications.
FOR MOST PROJECTS:
Resins
All laminating and casting applications require a resin, usually a polyester (although polyurethanes and epoxies can be used). The most widely used is Resin A (Lay-Up Resin), a general purpose resin used both for resin-casting, and for impregnating the glassfibre when laminating. Catalyst:
ALL resins, including Gelcoat, must be catalysed with hardener before use. Uncatalysed resin simply will not harden. Some resins are supplied with their own special catalysts - Fastcast and epoxies, for example. For polyester resins, catalyst is available as paste or liquid. Pigments:
Added to resin to make laminates and castings self-coloured. Pigment pastes are available in a wide range of colours. Brush Cleaner:
For removing uncured resin from brushes and tools - it will not be needed for some casting projects, where the only tools used are mixing sticks!
Barrier & Cleansing Creams: To protect or clean the skin - Barrier Cream should be worn in conjunction with gloves when handling resins or glassfibre, and Cleansing Cream (NOT Brush Cleaner) should be used to remove resins, etc, from the skin.
MAINLY FOR LAMINATING:
Resin B
Gelcoat resin, normally only used when laminating - it forms the smooth outer surface of the finished laminate. Glassfibre:
Mainly used to make laminated structures (although large castings can be reinforced with glassfibre). A variety of glassfibre mats, ravings and fabrics are available to give a choice of strength-to-weight ratios. The most widely used is probably Chopped Strand Mat. Release Agents:
Resins are highly adhesive, and bond firmly to wood, GRP, steel, plaster, hardboard, etc. When using a mould made of these materials, the resin must be prevented from adhering by the use of a parting agent, or Release Agent. These are not needed for flexible moulds - virtually all flexible materials in normal use are self-releasing compounds.
MAINLY FOR CASTING:
Fillers:
Inert filler powders are added to lay-up resin to produce a "slurry" for resin-casting, or to alter the texture of the resin. They are not needed for many laminating projects, unless added to create a particular surface effect (such as using metal powders when laminating replica armour).
PRECAUTIONS
Materials for resin-casting and laminating are safe to use, if they are handled with reasonable care and if these simple rules are observed:
ALWAYS work in a well-ventilated area
NEVER smoke or use naked lights or fires in the work area
ALWAYS wear gloves. Do not let any materials contact the skin, and especially the eyes or mouth.
NEVER swallow any of these materials.
Catalyst should be treated with special care: it is inflammable and corrosive - do not let it contact the skin, mouth or eyes. Should it do so, wash from the skin immediately under running water. If it contacts the eyes, flush them under running water for at least 15 minutes and obtain medical attention. Glassfibre, resins and ancillary materials should be used by young children ONLY IF CLOSELY SUPERVISED.
MOULD MAKING
The varied techniques possible with GRP materials tend to fall into two broad groups: casting and laminating. For either method, the first requirement is usually some kind of mould.
You can buy ready-made moulds (especially for casting items such as chess pieces) or make your own from original models.
The most popular mould materials for casting are the various self-releasing flexible mould compounds. There are three main types of flexible compound: latex materials; hot-melt compounds; and cold-cure synthetic rubbers. The last tend to be the most expensive, but are also the most durable and give the best reproduction quality. Original models can be made from almost anything - clay, plaster, plasticine, glass, porcelain, metal, etc. The only exceptions are ferrous metals, which should not be used with latex, and, if hot-melt compounds are used, the former must obviously be heat-resistant!
Plaster moulds can also be used, mainly for large items which would be prohibitively expensive in other materials.
There are instances, such as the production of simple geometric shapes, when the original model is not needed and a suitable mould can be constructed directly from plywood, hardboard or even cardboard, preferably covered in Polyester Film. Flexible moulds are rarely used for laminating, for which the normal choice is a rigid mould made from
GRP. This is produced by laminating over the model (often called a "former", or "plug"). The plug can be made from virtually any material, as long as it is accurate, rigid and has a highly finished surface. A small plug can be modelled in clay, or built from ply or fibreboard. Typically, a large plug might have a wooden framework covered with plywood or hardboard, or with clay or plaster reinforced with wire netting or hessian - or any combination of these. The choice of materials will depend very much on the specific requirements of the project in hand. Since the glassfibre mould will faithfully reproduce it, the plug surface must be totally free of defects or blemishes. Nails should be hammered well in and screws countersunk, with the heads covered with filler. All dents, joints and seams must be carefully filled, preferably with resin putty. On wooden plugs, the grain should be filled and carefully smoothed down -they can also be painted with Furane Resin, a coating resin which helps to give a wooden plug a highly glazed surface.
If the plug has a deep draught or undercuts, it will be necessary to make the rigid mould in two or more sections, otherwise the laminate will lock into the undercuts and be impossible to remove. This is often the case with model boat hulls, where the mould may be split along the keel line to allow for "tumble-home" at the stern. These sections will need flanges, so they can be bolted together. To produce the flanges, the plug should have "fins" fitted along the split-lines which separate each section. The fins can be made of any suitable material, such as thin aluminium sheet. Alternatively, the plug itself can be made in sections.
Latex Dipping Rubber
Latex is a natural, air-drying liquid rubber used to make thin, elastic, self-releasing moulds. It is best used for reproducing small, simple models without too much fine detail, and is frequently used for items such as chess pieces.
It is the easiest of mould materials to use - it needs no preparation and the original model, or "former", is simply dipped in the liquid rubber. A thin film of latex clings to the former and dipping is repeated until the required thickness is built up. Formers can be of glass, aluminium, porcelain, polyester resin, clay or plaster. Copper, brass, bronze or ferrous metal formers should not be used - a chemical reaction can occur, which will impair the rubber (for the same reason, latex should not be stored in containers made of these materials). Plaster formers are probably the best. They should be thoroughly dry before use. A handle of wire or wood is normally fastened to the base of the former, so it can be held comfortably whilst dipping. Lower the former gently into the latex, wait a few seconds, then remove slowly. Avoid stirring up the latex, as this could create air bubbles which will impair the mould (for the same reason, if the latex has been shaken up prior to use, leave it to settle before mould-making). If plaster formers are used, it is possible to make the mould in one dip, simply by leaving the former suspended in the latex solution - about 35 minutes is needed for a chess piece up to about 6" high. On removing the former, hold it the right way up, to stop latex trickling down and forming a bead.
After dipping, allow the latex mould to dry thoroughly for about 24 hours before removing from the former. Do not try to speed up the process by placing the mould in front of a fire, since the latex loses its elasticity if over-heated. If fast drying is essential, try holding the mould about 12" from a gentle source of hot air - for example, a hair dryer at its lowest setting. Once completely dry, the mould can be peeled from the former - it will usually peel off more easily if rinsed in dilute washing-up liquid or dusted with talc.
Vinamold & Gelflex Hot-Melt Vinyl’s
Vinamold and Gelflex are re-useable, self-releasing, synthetic rubbers based on vinyl resins. Very versatile, they produce moulds suitable for a wide range of casting applications -they can be used to cast epoxies, polyesters, plaster, and even fine concrete (for decorative paving). Up to ten castings are easily obtained from each mould. These vinyls are solid materials which must be melted down before use. Gelflex is supplied in ready-to-use granulated form, whilst Vinamolds are supplied in strips which need to be cut up before melting. They can be obtained in various grades offering a choice of flexibility. In general, the more flexible the material, the less durable, and vice versa. Greater flexibility is an advantage where the original model is particularly complex in shape, whilst durability is essential when a number of castings are required from the same mould. Different grades can be mixed to produce intermediate degrees of flexibility. Hot-melt vinyl’s can be used with any type of original model provided it is capable of withstanding heat (the vinyl’s melt at temperatures well above the boiling point of water - between 120°C and 170°C, depending on the grade).
Release agents are not normally required, although porous originals should be sealed with heat-resistant varnish. Wooden formers should be coated with a two-part polyurethane
varnish, which should be left to cure completely - for about seven days. Stone or plaster formers should be soaked in water then wiped dry before mould-making - this prevents rubber locking into the pores but still retains the texture. A damp clay model is an ideal former. The former must not be too wet - excess moisture will boil off when it contacts the molten material, creating bubbles in the mould. A retaining wall is needed around the former, to contain the molten compound once it has been poured. Any heat-resistant material can be used for the retaining walls - a practical choice would be melamine-faced chipboard. Joints and gaps should be sealed with wet clay. Keep some clay nearby in case undetected leaks occur during the pouring. Use a knife or spatula to plug such leaks -do NOT use the fingers, since the molten rubber will cause severe burns. For the same reason, wear thick gloves when melting the rubber. To melt the vinyl material, use a double-skinned melting pot. This has an inner compartment in which the vinyl is placed. When the pot is heated, the hot air circulating between the inner and outer compartments will melt the vinyl. Do not use the type of melting pot which needs water in the outer container. The water boils at too low a temperature to enable the rubber to melt - it will, in fact, act like the cooling system of a car engine! Carry out the melting operation in a well-ventilated room. Cut strips of Vinamold into small pieces (Gelflex, being a granulated material, is ready to use) and place in the melting pot, and heat slowly. Stir frequently, covering the container between stirring. If dark streaks appear and acid fumes are given off, the material is overheating and decomposing. If this happens, adjust the heat immediately - severe overheating will cause the rubber to ignite. A kilo of vinyl (enough for a mould with a volume of about 850cc) should take about 30-40 minutes to melt, when it should become a smooth, thin liquid with a creamy consistency. It is then ready for pouring.
Do not pour the molten liquid directly onto the former as air bubbles may be trapped. Pour the compound between the former and the retaining walls, pouring slowly and continuously until the former is covered to a depth of at least two inches. It is often a good idea to warm the former before pouring, as this also lessens the risk of air voids. Leave the mould to cool overnight, and it is then ready for casting.
When no longer needed, the mould can be washed, cut up and melted down for re-use.
Mastermould Cold-Cure Rubber
Mastermould is an excellent example of a cold-curing, self-releasing silicone rubber compound. Silicone rubbers are liquids which set at room • temperature as the result of a chemical reaction after the addition of catalyst (hardener). They cannot be melted down and re-used. They give very good reproduction of fine detail with minimal shrinkage. Mastermould is ideal for low-volume mass production - 40 or 50 castings are easily obtained, and, depending on the complexity of the moulding, a hundred or more resin castings are possible (when materials such as plaster are used, the number of possible castings is even higher). As with hot-melt materials, retaining walls are required round the former. However, as the silicone rubber is cold-curing, the walls do not need to be heat-resistant. The mould material is also completely inert, so almost any material can be used for formers and retaining walls, including plasticine, polystyrene foam and even children's construction toys such as "Lego". It is advisable to seal porous formers with Release Agent No 1, polyurethane varnish or cellulose lacquer. The varnish should be left to cure thoroughly for at least seven days before making the mould. Both the Mastermould catalyst and the base rubber tend to settle when stored, some of the contents forming a sediment. Before use, shake the catalyst well - the base rubber will need to be stirred. Prepare the Mastermould by adding the catalyst to the base material (one part catalyst to ten parts base by weight) and mix thoroughly. The base and catalyst are different colours - when properly mixed, the result will be an even colour. Any streakiness will indicate inadequate mixing. Try to fold the catalyst into the base, rather than stirring, to avoid creating too many air
bubbles. Leave the mixture to stand for a few minutes, so any air bubbles can escape, then pour the compound round the former - as with hot-melt materials, do not pour directly onto the former. An advantage of cold-cure rubber over hot-melt materials is that an initial layer can be applied to the former with a brush to ensure fine detail is filled. Leave this first layer for about five minutes, so any trapped air can escape, then pour the remainder of the compound. Once the former is covered, leave the mould to cure (without removing the former) for about 24 hours. The former can then be removed, but the mould should be allowed to continue curing, preferably for another 24 hours, before casting.
BUTTER-ON MASTERMOULD
A special thyrotrophic additive is readily available for use with Mastermould, turning it into a stiff "butter-on" paste which can be applied with a palette knife. This can be more economical than pouring, especially when making a large mould.
Mix up the Mastermould as previously described and, before adding the thixotropic material, brush an initial layer on the former. This ensures fine detail in the original model is filled. Now mix the thixotropic additive with the rest of the compound (4gm additive per 100gm mixture). It will begin to thicken immediately, and can be applied straightaway. Use a palette knife to apply the compound in a series of layers - the first layer should be pressed down firmly, to fill gaps and force out air trapped in voids. A cocktail stick makes a useful probe to check the thickness of the mould - it should be built up to a minimum overall depth of half an inch.
Two-Part Moulds
A complex model will sometimes necessitate the production of a mould in two or more parts. It is virtually impossible to do this with Latex, but, with materials such as Mastermould, it is a fairly straightforward process. One way of doing this is to begin with a smooth surface (a sheet of Melamine or Formica) and build on it a retaining wall of "Lego" bricks. Fill this with plasticine, pressed down firmly. You will now have a slab of plasticine, bordered by "Lego". Make the surface as smooth as possible - best done by twisting the whole slab to release it from the Melamine, and simply turning it upside-down, when the exposed surface will then be completely smooth and flat. Lay the original model (the former) on the flat surface and scribe carefully around the outline, using a fine stylus or needle. Remove the former and dig out the plasticine within the outline to create a cavity in which the former can rest. Replace the former which should now be half-buried in plasticine. Use small pieces of plasticine to fill any gaps. Make a series of depressions in the plasticine - these will create locating lugs in the mould. Any rounded instrument can be used. Alternatively, get some dome-headed screw-covers intended for mirrors (available from most hardware and DIY shops) and push these into the plasticine. The lugs should be about 2" apart. The plasticine surface can, if wished, be painted with a thin coat of diluted PVA Adhesive - this will save you the job of cleaning off bits of plasticine adhering to the mould. Build up the height of the retaining wall by adding several more courses of "Lego" bricks, and the Mastermould compound can be poured. Mixing and pouring are, of course, exactly as described above.
Pour the rubber and leave to cure for 24 hours.
When cured, the second part of the mould can be made. At this stage, you have a "sandwich" of Mastermould, former and plasticine, enclosed in retaining walls. Invert the whole unit, and carefully remove the plasticine -do NOT disturb the former. Remove small traces of plasticine by dabbing with a larger lump of the same material. If it has been more convenient to remove the retaining walls, they should now be rebuilt to a suitable height for the second layer of Mastermould to be poured. Although Mastermould is self-releasing from most materials, it adheres firmly to itself, so a release agent is needed. The best choice is Release Agent 1711 (available from Strand), which is sprayed onto the rubber surface. 1711 is very quick-drying, and the second layer of Mastermould can be poured at once, then left to cure for 24 hours. Once cured, the two halves of the mould should part easily, and you can remove the former. The mould is not yet ready for casting - first, a suitable hole (through which the resin can be poured) and vents (to allow trapped air to escape) must be cut out with a scalpel or fine craft knife. Very fine vents, which may be needed on small model figures (eg, 54mm scale), are best made by piercing the mould with a fine metal tube and removing a thin core of rubber (the ideal instrument for this is a hypodermic syringe needle). The vents must, of course, lead to areas where air pockets are most likely to form, eg, those parts of the mould corresponding to small protrusions on the model - the nose, ears and fingers of a model figure are obvious examples. Simply use the locating lugs to mate the two halves of mould, hold them securely together with tape, string or elastic bands, and your two-part mould is now ready for casting.
Cases
A flexible mould will cope easily with complex shapes and with such problems as undercuts, but, if it is too flexible, it may distort under the weight of the resin. The result will be a casting with a quite unexpected shape. This problem, which is most likely to be encountered when using vinyl’s or "butter-on" Mastermould, can be reduced by making the mould walls as thick as possible, but a better method is to give the mould additional support in the form of a "case", or outer container. In some instances, a cardboard or fibreboard box can be taped around the mould but usually the case would be of plaster or glassfibre laminate, which will follow the contours of the mould. Build the case before removing the former from the mould.
Plaster Moulds
Whilst flexible mould materials give excellent results, and are convenient to use, they can prove expensive in large quantities. Other materials are usually adopted when taking a mould from large models - life-size figures, for example. One method commonly used is to make a plaster mould, but this does have its drawbacks. The material is not flexible, so undercuts and complex shapes create problems, requiring the mould to be made in several sections. In most instances, the mould can not be used more than once - it is, in fact, a "waste" mould. Also, as the plaster bonds very firmly to the resin, a parting agent, or Release Agent, is required. You must use finely granulated plaster specifically intended for casting, to avoid losing definition of fine detail -do not use builder's plaster. Plaster moulds, which can be used for both casting and laminating applications, tend to be taken from originals modelled in clay. This can be coated with petroleum jelly or Release Agent No 1 to facilitate removal of the mould. Clay walls can be added to the original to separate the mould sections, or thin metal dividers can be used - the number of sections needed can be greatly reduced by designing the original to avoid undercuts whenever possible. The plaster should be applied initially in a thin coat, mixed to as creamy a consistency as possible. It needs to be fairly liquid to ensure fine detail is reproduced, but not so thin that it drains from the model. A much thicker mixture can be used for successive coats, which should be built up to the required depth. A mould about 12" across should be at least half an inch thick, larger moulds proportionately thicker. The plaster can be strengthened by incorporating a scrim of Hessian or, for maximum strength, glassfibre. It will also be stronger if PVA Adhesive is added to the mix - use a tablespoon of PVA for every pint of water in the mix. Leave for at least a day, after which the plaster should be hard enough to remove from the model. For best results, leave it another two or three days to harden completely. Before use, the plaster mould surface must be sealed with polyurethane varnish or, better still, Release Agent No 1, then prepared with release agents, using the same method detailed below for GRP moulds.
GRP Moulds
A rigid GRP mould is easily the best one to use for most laminating projects. It is made by laminating glassfibre over a former, or "plug". A simple, geometric plug made of flat sheets could be faced with self-releasing polyester film, but, in most cases, the plug must first be treated with release agents prior to laminating the glassfibre mould. If the plug is made of porous material such as plaster, seal it with Release Agent No 1. Then wax and polish the plug with four to'six coats of Release Agent No 3 - leave each coat to harden thoroughly, for about an hour, then buff before applying the next. Finally, Release Agent No 2 is used to provide a surface coat. The mould is produced by the same method used for any other glassfibre lay-up - a layer of gelcoat, followed by successive layers of glassfibre impregnated with Resin A. This is explained in detail in the section on Laminating Technique. The only difference is that the mould needs to be much thicker (often twice as thick) than the finished item. This would involve considerable expense on large moulds, but economies can be obtained by the judicious use of strengthening ribs and stiffeners. Add these ribs after the mould has partly cured, or contraction of the surrounding laminate may leave an impression on the mould surface. The ribs are easily made by laminating over a suitable former (see "Formers").
If the mould is in two or more sections, these will need flanges (preferably about 75mm wide and at least 50% thicker than the rest of the mould) which can be drilled later so the parts can be bolted together. Leave the mould to cure completely (preferably for at least two weeks) before removing from the plug - too early removal can result in distortion. There is no size limit for such a mould - commercially, GRP moulds are used for such items as boat hulls thirty or forty feet long - but it is advisable to give a large mould added support by bonding on a wooden framework. Let the mould "breathe" for a few days before filing or sanding any imperfections - there should not be many of these if the plug was properly finished - and then it must be treated with release agents before use.
Other Moulds
For some applications, such as clear casting, it is possible to utilise polypropylene or polythene containers as moulds. These will be self-releasing. They are readily available as containers for a variety of foodstuffs and household products. Do not use polystyrene containers -these will literally dissolve in contact with polyester resin!
“Direct" Moulds
As stated earlier, it is possible to make a mould directly, without an original model or former. This is usually only possible for relatively simple shapes -a box or trough, for example, or a
simple geometric shape for clear casting. It would normally be constructed from sheet materials - ply, hardboard, metal, glass or (for small items) cardboard. Where possible, the material should be faced with polyester film - otherwise, it will need to be treated with release agents. If plastic sheet material is used, these may well be self-releasing - but do not use ABS, polystyrene or acrylates (eg, Perspex) as these are attacked by polyester resins. Polystyrene foam materials can sometimes be used if they are totally protected from the resin. This can be done by spraying with latex thinned with distilled water, but the method is not always completely reliable.
RESIN CASTING
ESTIMATING QUANTITIES:
It is difficult to give accurate directions for calculating the quantities of materials needed in casting, since it is normal to use a mixture of resin and filler powder, and the consistency of the resin/filler mix can vary widely. The following table shows the amount of resin required, with various resin-to-filler ratios, for a range of mould sizes. (To find the volume of a mould, simply fill it with water then empty this into a measuring jug. Make sure the mould is dry before you use it!)
Casting from Latex Moulds
The following method would be the usual procedure for casting chess pieces and similar small items from latex moulds. The basic technique applies to most casting projects, although details, such as quantities of materials, will differ from one project to another.
Place the mould/s upside-down in a suitable holder (an upturned cardboard box with holes cut in the bottom makes an appropriate rack). Half-fill a plastic mixing cup with lay-up resin and another with filler powder. This will provide a useful working quantity for a small casting, and also gives equal volumes of resin and filler (the consistency of the mix can be varied to suit specific requirements). If the casting is to be coloured, stir into the resin enough pigment paste to provide the desired depth of colour, up to a maximum of 10% pigment (any more will adversely affect the resin's curing properties). The colour may alter once filler is added. Sprinkle the filler into the resin, stirring thoroughly, then leave to stand whilst air bubbles disperse. Tap the side of the cup to bring bubbles to the surface. Add catalyst to the mixture, stir, and let stand for one or two minutes before pouring into the upturned moulds. Squeeze each mould gently to force out any air trapped in the undercuts. Top up the mould with more resin mix if necessary, but avoid filling over the flange. Leave to set, which should take about half-an-hour in a warm room. When hardened, peel off the mould. (This may be easier, especially with a home-made mould, if diluted washing-up liquid is rubbed over it). Wash out the mould with warm, soapy water, dry thoroughly and dust with talcum powder before re-use.
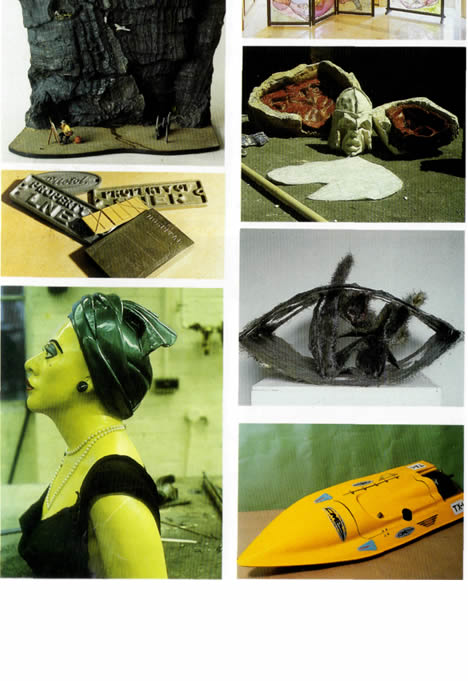
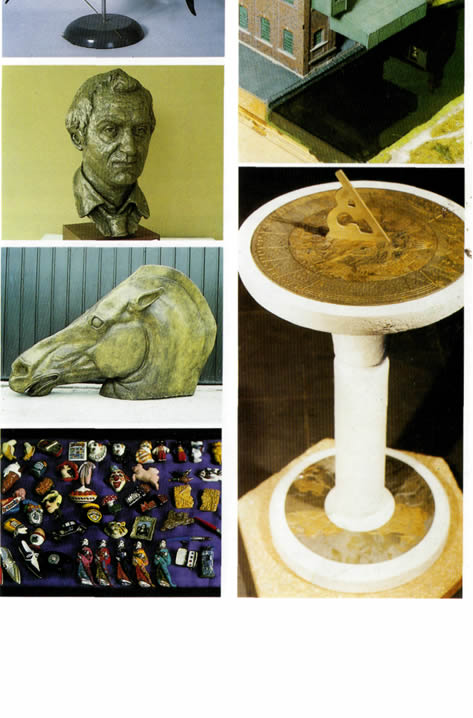
Above models, replicas, sculptures, craftwork – a selection of the Innumerable projects possible with resin and glass/tore.
Casting from Other Flexible Moulds
Casting from other types of flexible mould follows the same basic procedure, with some minor variations. As before, mix lay-up resin and filler powder to the desired consistency (with pigment if required), and catalyse. Stir, and let stand for one or two minutes to allow air bubbles to disperse, before pouring into the mould. Agitate the mix to make air bubbles rise to the surface. On flat, open moulds (eg, wall plaques) it is often useful to brush a layer of resin into the mould to ensure all detail is filled, and that no air is trapped in the undercuts, before pouring the remainder of the mix. If the casting is fairly large, do not pour all the resin at once. The internal heat ("exotherm") generated by the curing process increases in proportion to the volume of resin, and can be sufficient to crack the casting. It is therefore advisable to pour the resin mix in a series of layers, letting each layer cure partially before adding the next. This will help to avoid excessive exotherm and to reduce shrinkage (a major cause of inaccurate reproduction of fine detail). But do not leave a layer longer than 90 minutes before pouring the next (this also applies when an initial layer is brushed on).
Larger castings will usually need to be strengthened by being reinforced with material such as Hessian, or, better still, glassfibre. Wait until the casting has begun to cure, then paint the back with Resin A. Lay down a piece of glassfibre mat and push it gently into the wet resin with a brush. Use a stippling action and keep the brush loaded with resin to ensure the glassfibre is thoroughly impregnated. Normally, a metal laminating roller is used to consolidate a laminate and force out air bubbles. The irregular surface of most castings makes this virtually impossible, so the stippling process must be used to compress the glassfibre as much as possible. The process is repeated if an additional layer of glassfibre is needed. (On a very large mould, the method required is more one of laminating than casting - see the section on "Laminating" for full details).
Leave to set, which should take about half-an-hour in a warm room. This will vary, depending on the precise proportion of catalyst used, the exact temperature, and other factors. When the casting has hardened, it can be removed from the mould. Wash out the mould with warm, soapy water, dry thoroughly and dust with talcum powder before using for further castings. A vinyl mould which is to be melted down must be especially clean before it is cut up and re-melted.
Casting from Plaster Moulds
The procedure above is also used when casting from plaster moulds. One essential difference is that a plaster mould (or, indeed, any mould made from porous materials - wood, fibreboard, etc) must be treated with release agents. If this is not done, the casting will bond firmly to the mould and will be impossible to remove. The mould should first be sealed with shellac, polyurethane varnish or, for best results, Release Agent No 1. Then apply a wax release agent, such as Meguiars or Honeywax etc.
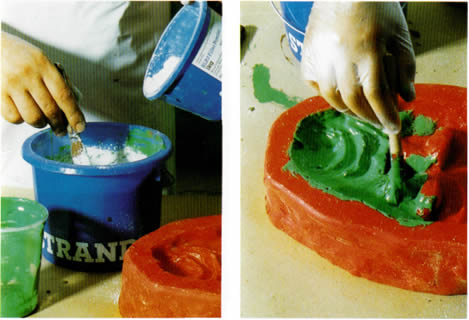
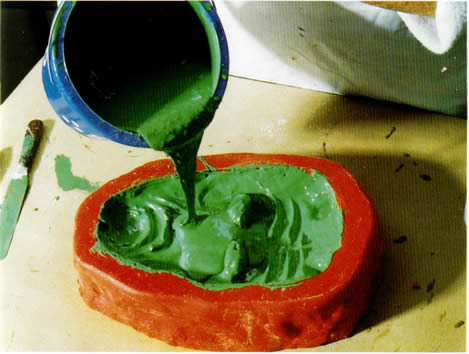
(Above left) Mixing pigmented resin and filler powder (Right) Brushing filled resin into the mould (Below) Pouring the remainder of the resin.
Metal Castings
Powdered metals, used as fillers, result in castings with a realistic metallic finish. They are used in the same way as filler powder, except the resin is catalysed BEFORE adding the powder, instead of afterwards. This is to neutralise the catalyst, which would otherwise have a corrosive effect on the metal. For metal castings, always use 2ml of catalyst per 100gm resin. The higher the proportion of metal to resin, the better the finish. Generally speaking, a 50/50 mix, by volume, is a minimum ratio. The finished casting will not look very metallic - the surface will be dulled by a thin layer of resin. Removing this surface layer by buffing with wire wool then metal polish produces the realistic metallic sheen. Different metal powders can be mixed together if required - mixing aluminium and,a little brass, for example, produces a good simulation of old tarnished silver. The powders should be mixed before they are added to the resin. Graphite powder rubbed onto the finished casting will also give an "aged" effect. A better effect can be obtained by mixing the graphite with the metal powder (1 part graphite to 10 parts metal, by weight) before adding to the resin. Aluminium castings can be coated lightly with "grate black", such as "Zebrite", then sealed with a spray varnish - the result resembles forged steel, and gives a pleasant antique look to such items as reproduction armour. A suitable varnish is the spray fixative marketed by Letraset for use with rub-down lettering! Other ageing effects can be obtained by coating the surface with leather or wood dyes mixed with a little acetone. Wipe the excess off with a cloth lightly damped in acetone.
Clear Casting
Clear casting resin is used to embed objects in transparent plastic, either to produce paperweights and other decorative items, or to preserve medical and biological specimens. It can also be used very effectively in the production of costume jewellery. Moulds can be home-made from glass or plastic (glass will need to be treated with release agent). Do not use flexible rubber moulds - these will allow air to percolate through to the resin, inhibiting the curing process and resulting in a tacky surface. You can make a mould from card, wood or fibreboard, if you cover the surfaces with self-releasing Polyester Film - but make sure the joins are properly sealed, or you will be faced with leaking resin! Polythene cartons can be readily utilised, but not polystyrene which is dissolved by the resin.
Making the Casting
Catalyse some resin (as shown in the table) and pour into the mould to form a base layer. When this reaches a firm consistency, place the specimen on it and pour a little more resin around it. A light specimen may float and will need to be glued to the base layer with a few drops of resin. In a very small casting, the specimen can be covered in one pouring, but it is usually best to build the casting up in a series of layers - a large casting generates considerable heat which may result in cracks if done in one pouring. When the final layer has set firm (or "gelled"), cover it with Polyester Film or cellophane to exclude air, otherwise it may set with a tacky surface. Leave to harden then remove from the mould. The casting can be further shaped or polished using the same methods employed^
Preparing Specimens for Clear Casting
Specimens to be embedded must be clean, dry and free from oil or grease.
Insects
Remove natural oils by dipping in a grease-solvent such as acetone (remember that acetone is^^ highly inflammable). Leave the specimen to dry completely. For best results, dip in uncatalysed^-' r resin and leave overnight to drain (this will leave a thin film which will avoid shrinkage and "silvering".
Flowers
Dry thoroughly by placing in a tray or other container, filling with either silica gel crystals or dry fine
silver sand, and leaving for several days in a warm atmosphere, they should then be sealed with
polyurethane varnish or hair lacquer. Some plants will take longer than others to dry - this is
best determined by experiment. The water content affects the colour of some flowers, which will
fade
more than others when dried. In some cases, it is a good idea to dip the plant in uncatalysed resin
and leave overnight to drain.
Paper items (eg postage stamps)
Seal with a thin coat of polyurethane varnish or hair lacquer.
Coins, medals, pebbles, shells
Wash to remove dirt or grease, and dry thoroughly, then dip in uncatalysed resin and leave overnight to drain.
Polystyrene models etc
Coat with thin two-part epoxy laminating resin and allow to cure for at least seven days before embedding Any other casting or laminate (see "Finishing").
A clear casting can sometimes be enhanced by having one layer, usually of base, pigmented to make it opaque. This provides an effective contrast with the rest of the casting. If an inverted mould is being used, the layers are poured in reverse order - ie, the last layer is the base of the finished casting. In this case, the opaque base can be made with pigmented Resin A, which neatly avoids the possibility of surface tackiness.
The ingenious user will find that Clear Casting Resin can be put to a variety of uses. It can, for example, be employed to make very realistic ponds, streams and other water effects in model landscapes - for this application, you will need to add 2gm of accelerator to each 100gm of resin and mix thoroughly BEFORE catalysing. This will effectively reduce surface tackiness. However, this is a very hazardous material to use -make sure you read the Safety Information on Accelerator in Appendix 2! A safer method of reducing surface tack is by floating on a thin final coat of two-part epoxy laminating resin.
Another possible application for clear castings is constructing three-dimensional geometric forms, such as dodecahedrons, from card covered with polyester film. These can then be used as moulds to create fascinating abstract castings, particularly effective if the resin is lightly tinted with pigment. Interesting effects can be obtained by adding drops of pigment to the resin, and leaving it to spread rather than mixing it evenly. If a container is loosely lined with polyester film, the casting will not only follow the shape of the container but will also reproduce the folds and ripples in the film, often with intriguing results. A little experimentation will reveal numerous other creative opportunities.
Polyurethane resin castings
Fastcast is a good example of a polyurethane casting resin. It produces strong, durable castings with very high definition and excellent reproduction of fine detail from flexible rubber moulds. It has very low shrinkage and is particularly useful for casting small scale models and components. It is extensively used by commercial model-makers in the manufacture of high quality model kits. Although a little more expensive than polyester resin, it has the advantage of being very fast-setting and very easy to mix and measure. For the home user, polyurethane resin has the even greater advantage of being odourless, for it does not emit styrene fumes, which create the characteristic aroma of polyesters. It is used in much the same way as polyesters, and with the same types of mould, but with one or two slight variations of method. One difference is that materials which are normally self-releasing from polyester resin will adhere very firmly to polyurethane, so all moulds have to be sprayed with a special release agent (Release Agent 1711). The resin is especially affected by moisture, and all filler powders, moulds, mixing containers and tools must be completely dry - to the extent that conventional filler powders, which absorb atmospheric moisture, cannot be used (special non-absorbent fillers, such as 3M Glass Bubbles, are available).
The resin is supplied as a two-part kit, one part being the resin base and the other a special catalyst (you cannot use the catalyst supplied with polyesters). Measure out equal amounts (by weight or volume) of each part into separate mixing cups, and stir thoroughly before mixing. Then mix the two parts and stir thoroughly again. Pigment pastes are not recommended (the casting can be painted after curing). Pour into the mould immediately, as the mixture gels within two or three minutes, and leave to cure. It is not necessary to pour large castings in layers, since Fastcast has very low exotherm, but it is a good idea to wipe an initial layer into the mould with a brush to reduce the possibility of air bubbles being trapped. If for some reason (such as mixing an insufficient quantity), it is necessary to pour a second layer, this should be done within ten minutes of the first pouring - otherwise, the first layer will have cured too much for an adequate bond to form. The casting can be removed from the mould in 30 minutes, but should be allowed to cure for another two hours at room temperature.
Large castings can be backed with polyurethane foam materials. Polyurethane liquid foam mix can be used in conjunction with Fastcast, if the following method is adopted:
1) Make sure the workshop is well-ventilated (the foam mix produces cyanide fumes). If possible, it is a good idea to mix and pour the liquid foam outdoors.
2) Prepare the mould with Release Agent 1711. The mould must be well-supported (the foam mix creates considerable pressure when it expands). To relieve this pressure, an enclosed block mould must have suitably large vent holes.
3) Mix Fastcast as described above.
4) Brush on two or three layers into the mould to build up the surface thickness. Leave to cure for 20 minutes then pour remainder.
5) Mix the foam (as described in the section on Polyurethane Foam). Pour into the mould.
6) Leave the foam to cure for 24 hours, then trim off excess material.
7) If necessary, mix up some more Fastcast and brush two or three layers onto any exposed-foam surface. Like polyesters, polyurethane castings can be sanded, filed, polished, or drilled - in fact, due to their excellent resistance" to impact, they can stand up to a great deal of this treatment. As with polyesters, a face mask and goggles should be worn when drilling, filing or sanding.
The castings can also be painted. Wash the casting thoroughly to remove traces of release agent before painting. Enamels, acrylics and oil paints can be used. Aerosol cellulose paints (as used on vehicle bodywork) are fine, as long as the surface is first primed, and the primer left to harden for at least 24 hours. Polyurethane castings can be bonded together (or to other materials, including metal) with "five-minute" epoxies, such as Araldite Super, or with cyano-acrylate adhesives, such as Loctite and similar superglues.
The variety of projects possible with fibreglass materials means that no one method is "correct" - many variations of basic technique can be used to suit individual projects. This is the method adopted by
sculptor Steve Melton in casting from a 15' clay figure. A thin wall of clay is used to partition off a section of the figure. The section is covered with plaster, built up to a thickness of about two inches. Once the plaster is firm, the clay wall is removed.
This is repeated on a further section of the figure. Clay slip is used at the Join to prevent the second section bonding to the first. The sections are deliberately made a different size so that the joins are off-set, as in a brick wall. Do not make the sections too large (see below).
Metal brackets are moulded to each section with plaster and scrim. The brackets will be used later to bolt the mould sections together. The process is continued, section by section, until the entire figure is covered by plaster. The mould is removed from the figure, assembled, and left to harden completely (if it is not assembled, the separate pieces may distort during hardening, and will no longer fit together accurately).
After it has hardened, the mould is disassembled and the sections painted with sealer. A coat of wax release agent is then applied.
Gelcoat resin, mixed with metal powder, is painted onto each section of mould surface, followed by a layer of glassfibre impregnated with lay-up resin, and stippled down firmly. The sections are then re-assembled. Each join is pained with gelcoat and strengthened with additional strips of glassfibre. This will be very difficult if the sections are too large - bear this in mind when making the mould. The sections of mould are removed from the complete figure. Irregular ridges, left by resin seeping between the mould sections, are then ground down to finish the sculpture
Laminating Techniques
A GRP laminate is produced by building up layers of glassfibre impregnated with resin. The glassfibre acts as a reinforcement for the resin, and the resulting combination is an incredibly versatile material, easily moulded to virtually any shape, and capable of making structures of almost any size.
Getting Started
Laminating requires much the same tools as casting - catalyst dispenser, brushes and mixing containers. The only additional items are one or two metal laminating rollers. All the workshop details given for casting apply equally to laminating.
Materials
The materials normally required for most laminating projects include Resin A, catalyst, pigments and Brush Cleaner, as used for casting. In addition, you will normally need the following: Gelcoat:
A resin which forms the smooth outer surface of the finished laminate and is therefore applied first to the mould. Glassfibre: Various glassfibre materials are available, of which the most widely used is probably Chopped Strand Mat. For certain specialist applications, one can use high performance reinforcements, such as Kevlar, a synthetic aramid material with excellent impact resistance, and Carbon Fibre, which gives greatly increased rigidity to the laminate. There are also combination materials, such as Aramat, in which Kevlar and glass-fibre are interwoven. Release Agents: Unlike flexible moulds, the rigid moulds normally used for laminating are rarely made of self-releasing materials, so you will need release agents. These are applied to the mould prior to laminating, to prevent the laminate adhering to the mould surface.
LAMINATING - THE BASIC METHOD
Preparing the Mould
The best results are usually obtained by laminating into a rigid GRP mould. Unlike moulds made from "self-releasing" materials, such as polyester film or flexible rubber compounds, the GRP mould will need to be treated with release agents to ensure the laminate does not bond to the surface. If you use Strand own-brand Release Agents, first apply up to six coats of Release Agent No 3 (Wax), allowing each coat to harden for an hour before buffing and applying the next. The final coat should be covered with Release Agent No 2, a PVA solution which glazes the surface. This dries in about 15 minutes, after which the mould is ready for laminating. If your mould is made of plaster, wood or hardboard, you can use the same release treatment, but you should first seal the surface with Release Agent No 1, or with polyurethane varnish. Allow varnish to harden completely, usually for about 7 days, before applying the release wax.
Preparing Resins
Prepare the resins by mixing in the required pigment. Too much pigment prevents the resin from curing properly, so do not use more than one part pigment to ten parts resin. Ideally, you should pigment all the resin, lay-up and gelcoat, although you can economise by pigmenting the gelcoat only.
The Gelcoat
Add catalyst to the gelcoat (20ml of catalyst per kilo of resin) and stir thoroughly. Then paint the gelcoat in long, even strokes over the entire mould surface, using a brush or a polyester roller generously loaded with resin. Do not make the mistake of brushing out the gelcoat too thinly - it is important to remember that this is not a paint or varnish, but a construction material which forms the outer skin of the laminate. You should be using at least 400gm, and preferably 450gm, of gelcoat to cover each square metre of surface - if you use less, the layer is much too thin.
Lay-up
Wait for at least an hour, by which time the gelcoat should feel slightly tacky but will not actually adhere to the touch. Make sure there are no corners or crevices into which the gelcoat has drained, where it may still be wet. Then catalyse a suitable quantity of lay-up resin (Resin A) which you have already pigmented. Paint the Resin A over the gelcoat. Whilst the resin is still wet, lay down a piece of glassfibre. Use the brush to press the glassfibre firmly but gently into the wet resin. If the glassfibre material is Chopped Strand Mat, use a stippling action - do NOT "paint" to and fro, as this tends to separate the glass fibres. Keep the brush well-loaded with resin to ensure the glassfibre is completely "wetted-out". Once it is thoroughly impregnated with resin, use a metal laminating roller to consolidate the layer and force out air bubbles (it also forces resin through the fibres from beneath, helping to ensure complete impregnation). Continue this process with further pieces of glassfibre to cover the entire mould surface.
Further Layers
To put down a second layer, simply lay it on top of the first, and stipple the glassfibre into the wet resin. If the previous layer is now too dry, paint on another coat of Resin A first. The second layer, like the first, must be thoroughly "wetted-out" and consolidated. Any number of layers can be built up depending on the thickness and strength required. For many jobs, two layers will be adequate. Remember that whilst a thicker laminate will be stronger, it will also be heavier - and it will generate heat due to "exotherm". Rather than making the laminate thicker, it is often a good idea to make it stronger or more rigid simply by adding ribs of glassfibre laminated over formers of paper rope. Plastic tubing, strips of timber or foam, and folded cardboard can also be used as formers (see the section on "Formers" for more details).
During laminating, the resin on the brushes and tools will begin to solidify. Prevent this by washing them in Brush Cleaner (acetone) which will dissolve the resin. They must be wiped dry before re-using. Remember acetone is highly inflammable - do not smoke or use naked lights anywhere near it! It is very volatile, and tends to evaporate, so keep it in a covered container.
When the required layers have been built up, leave the laminate to cure. It will soon reach "green stage". At this point, it will be quite firm, but still soft enough for rough edges to be trimmed off with a Stanley knife.
This advice and information is given in good faith for guidance only. and is given without warranty, users should determine information given and using their own judgment to determine suitability.