Resin Infusion Guide
RESIN INFUSION - A Step by Step Guide
Introduction:
Combining carbon fibre with an epoxy resin is the most common way to generate a carbon composite but it isn't as simple as it might seem. The most important issue during the curing phase is to ensure all air is removed from between layers of the material and from the Surface.
Wet Lay Up
Traditional wet lay-up, as seen in mass production in polyester and glass fibre is rare in carbon and epoxy as removal of air is almost impossible without some form of compression - which we usually call consolidation. Thin plies can however be laid up like this in simple moulds to produce simple shapes without too much air being included.
Resin Infusion
Dry reinforcement fabric is loaded into the mould, using self-adhesive spray as appropriate to hold it in place. A full stack of vacuum consumables, including an infusion bleed fabric, is applied to the back of the part, followed by a gallery and inlet for the resin system (blanked off at this time) and the vacuum bag closed with a 'tail' for attaching to the resin reservoir left protruding from the bag, usually with a simple resin tap in the closed position preventing any air leak.
The vacuum pump is applied in the usual way and the component checked to remove any leaks. The item could be left on full vacuum for several hours.
When the vacuum has been applied for sufficient time, a low viscosity, slow curing resin, formulated for resin infusion applications is mixed, and the tail of the resin inlet put into the reservoir or resin pot. The resin tap is opened and the infusion resin flows into the part. The time taken for a full infusion of resin depends on the thickness of the laminate. When the resin has fully infused the part, the resin tap is closed and the part allowed to cure under full vacuum.
Vacuum Bags in General:
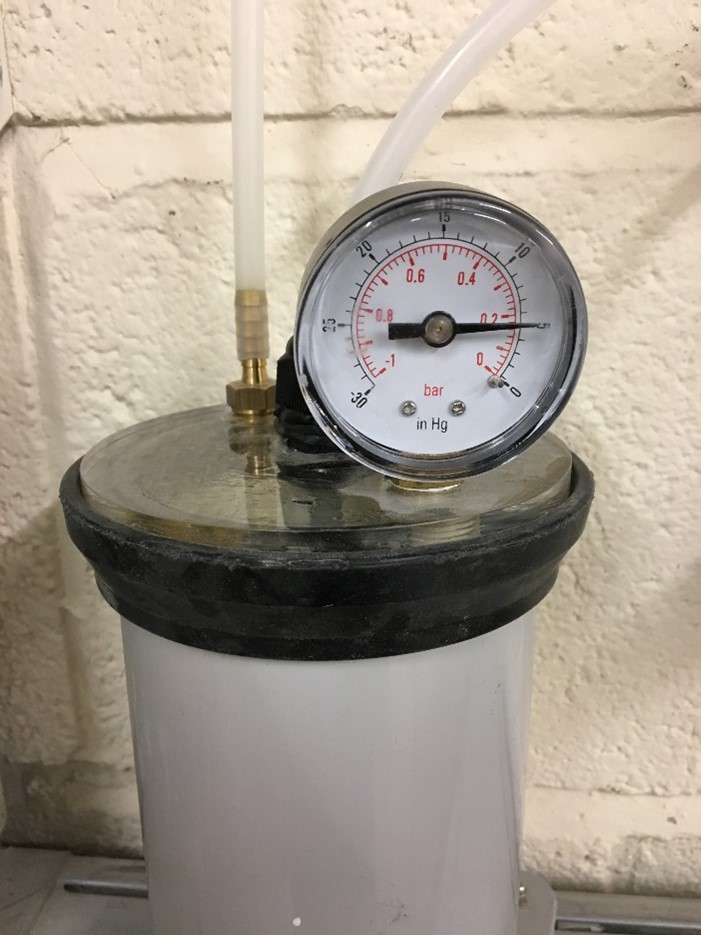
All vacuum bags needs to be made and fitted carefully and in all cases it is essential to make sure the vacuum stack is in the right sequence for the job, that the bag has no bridging or tight areas and that there are absolutely no leaks. In the case of the latter, a vacuum gauge attached to a quick release coupling allows the user to check the loss of vacuum by disconnecting the pump and fitting the gauge to the bag. There should be no losses over a period of about a minute.
Lets get started!
So we've established that Resin Infusion Involves using a vacuum pump to draw resin through a laminate removing any air at the same time using a vac bagging film and various other vacuum bagging consumables. However When attempting this technique for the first time it is a good idea to bear in mind that the first few attempts may not go to plan as this technique does take a bit of trial and error to get it right. Start off with something simple so that you can learn and understand how the process works. There are plenty of video tutorials on YouTube and information on the internet and everyone may have their own techniques that work for them. In this guide we will be showing you the technique that works for us and that we use in our workshop.
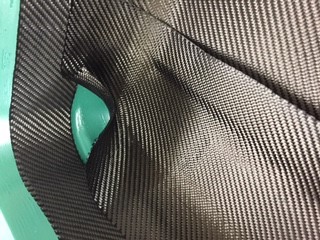
When placing your cloth into your mould bear in mind that there must be no bridging of the material in corners etc. as this will cause the area to become either resin rich or create an air void. The picture above show that in this instance we have cut the material to allow it to conform to the corner. Make sure you cut straight and remove any loose strands that may fall between your cloth and your gelcoat as these will show on your finished part.
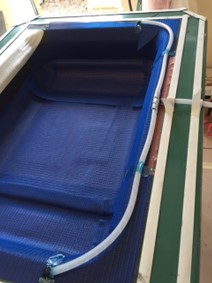
After you have all your materials in place we next lay Infuply (shown above) into the mould this will aid resin flow throughout the composite material.

Here is the Infuply laid into the mould on top of our material. Infuply is a combination of release film and infusion mesh. The mesh helps resin flow and the release film prevents the mesh sticking to the finished laminate. Without the Infuply the bag will most likely cut off the resin flow preventing it from traveling through the material.
On the right hand side we have laid some off cut cloth, in this case UD tape, but any off cut cloth will do. This off cut material will act as a resin break to slow the resin down once it has completed its flow around the main laminate. This will allow us time to clamp off our lines.
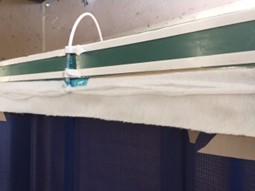
Next a Infusion wrap is placed at the opposite end to where we put our resin break, the spiral wrap and resin break are usually placed at either end on the widest part of the mould so that the resin has the shortest distance to travel. Here the ends of the spiral wrap are plugged with a piece of low temp sealing tape and the spiral wrap is secured in place with flash tape. A plastic ‘T’ piece as inserted into the centre of the infusion wrap then the 6mm infusion hose is pushed onto the protruding end of the ‘T’ piece. See close up image below.
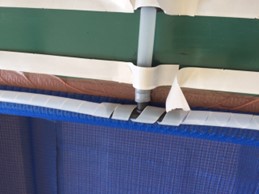
The hose is positioned over both the inner and outer ring of low temperature sealing tape with more low temp tape applied over the hose. To do this simply peel off a 2” section of the backing paper from the low temp tape sandwich the tube in place with more sealing tape. See Figure 1 below:-
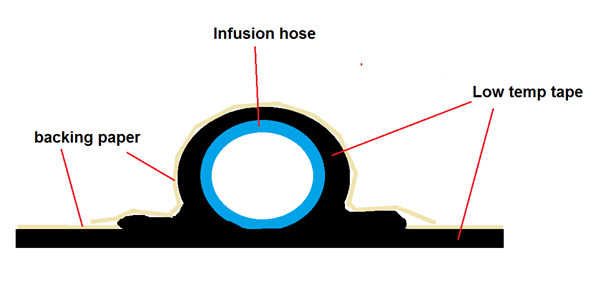
Figure 1 hose secured and sandwiched between low temperature sealing tape
Next PTFE release fabric is placed over the resin break to prevent flow medium such as breather fabric from bonding to the Resin break and exposed laminate.
A strip of Breather fabric is then laid over the peel ply.
Attach another length of infusion hose, sandwiched between low temp sealing tape, in the same way as you did with the spiral wrap however instead of a ‘T’ piece and spiral wrap we are going to attach some infusion braid to this side.
Attach the resin catch pot to the other end of this hose then using another length of hose attach the catchpot to your pump.
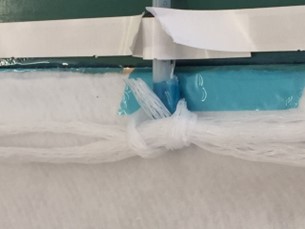
One end of the infusion braid is pushed into the infusion hose approx. 1-2 “ in to the hose, then lay approx. 3-4 runs back and forth of braid along the breather fabric and tie the opposite end back at the hose.
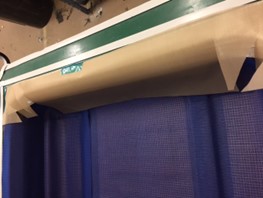
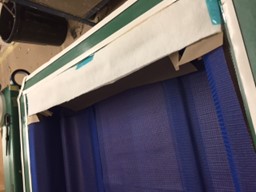
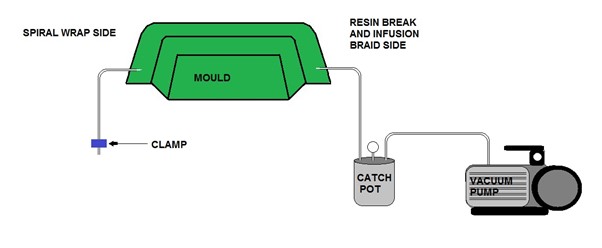
Once the hoses have been set up on both sides attach a clamp to the opposite end of the hose that inserts into the ‘T’ piece. Now that you have your hoses, catch pot and pump set up you should have a set up that resembles this:-
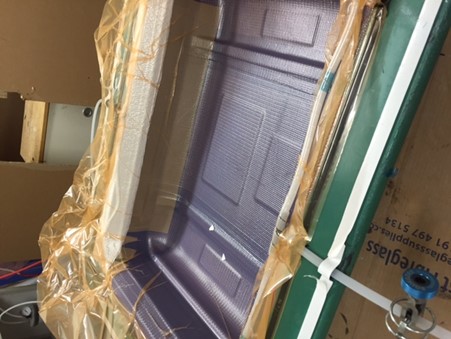
Now we start to apply the bagging film ensure you have enough bag to create plenty of pleats and gather into the mould, basic rule of thumb is that the bag should be over 50% bigger than the mould surface area. Do not peel off any backing paper from the sealing tape until you are sure you have enough bag to work with. If the bag is too small it will bridge over corners and the laminate will become resin rich in these areas. The bag should have plenty of creases and gather into these corners with no stretching, bridging or stress to the bag.
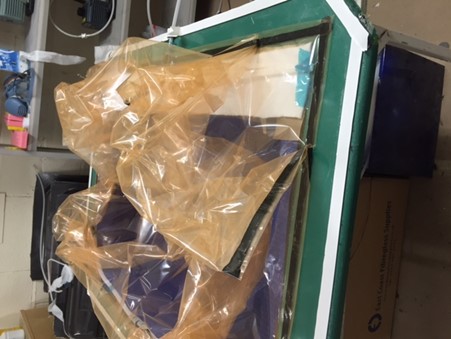
Get the bag centred on the longest end and begin to attach the bag to the inside run of sealing tape, Peeling back the backing paper as you go when you come to a corner you will need to make a pleat. When you create the pleat seal the open end of the pleat with a strip of sealing tape, ensure that the sealing tape goes right the way into the corner of the pleat and that the sealing tape joins again onto the main ring of sealing tape going around the mould, basically continuing the seal. Carry on until you come to your next corner and repeat as you go.
once completed and you are sure you have a good seal attach your pump to the hose at the resin break end, clamp the hose at the spiral wrap end and switch on your vacuum to try a dry run, check around the bag and the pleats to ensure you a complete seal with any air leaks. The bag should become so tight that you cannot move it. If you are not achieving full vacuum, run your fingers around the sealing tape and make sure the bag and tape are firmly adhered to each other, and that there are no hairline gaps between the vacuum bag and the sealing tape.
This should be all you need to do for a standard set-up and most people using this process will leave it at that and start to infuse the resin through, using only this one bag, however as a belt and braces approach we find it is good practice to double bag. As the laminate materials can be more expensive than the vac bagging consumables, this is good practice to reduce chances of vacuum loss and potential waste of materials and time especially if infusing expensive carbon fibre. Notice that our set-up from the start has two runs of high temp sealing tape. We have an inner ring running around the laminate approx. 3” in, and we have a second ring of tape just at the edge of our mould’s flange. This outer ring will be where we attach our second bagging film. This outer ring is not required if you are using only one bag (see below for secondary bag set-up:-
RUNNING A SECOND BAG
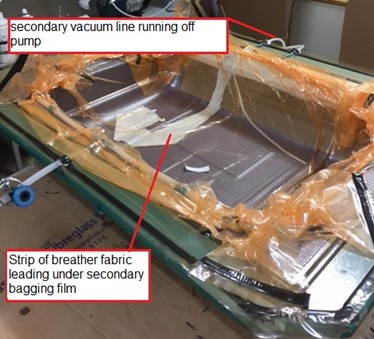
In this stage we will attach another piece of hose, just at one end this time, sandwiched between just the outer rings of low temp sealing tape with a strip of breather wrapped around the end of the hose leading into the middle of the mould so that it is laying over the inner bag. Then we will attach a second outer bag to the outer ring of sealing tape just like we did earlier with the inner bag. From the pump we will have this hose attached using a Vacuum ‘Y’ Piece so both lines leading into the inner and outer bag are attached to the same catch pot. Test that this outer bag is also working by drawing vacuum as we did with the first bag.
Once you are happy that everything is running well Clamp off the outer bag air line for now.
You can mix up your infusion resin with the hardener, un-clamp the hose, and pop the hose into your bucket of resin. Ensure that at no point does the hose fall out of the bucket or air will be drawn into you part.
Switch on your pump to draw the air out of your inner bag, once the resin begins to flow you can release the clamp from your secondary line allowing your secondary bag to start working.
Once resin begins to wet out your resin break you can clamp off the line to your resin supply but leave the pump running until the resin has cured.
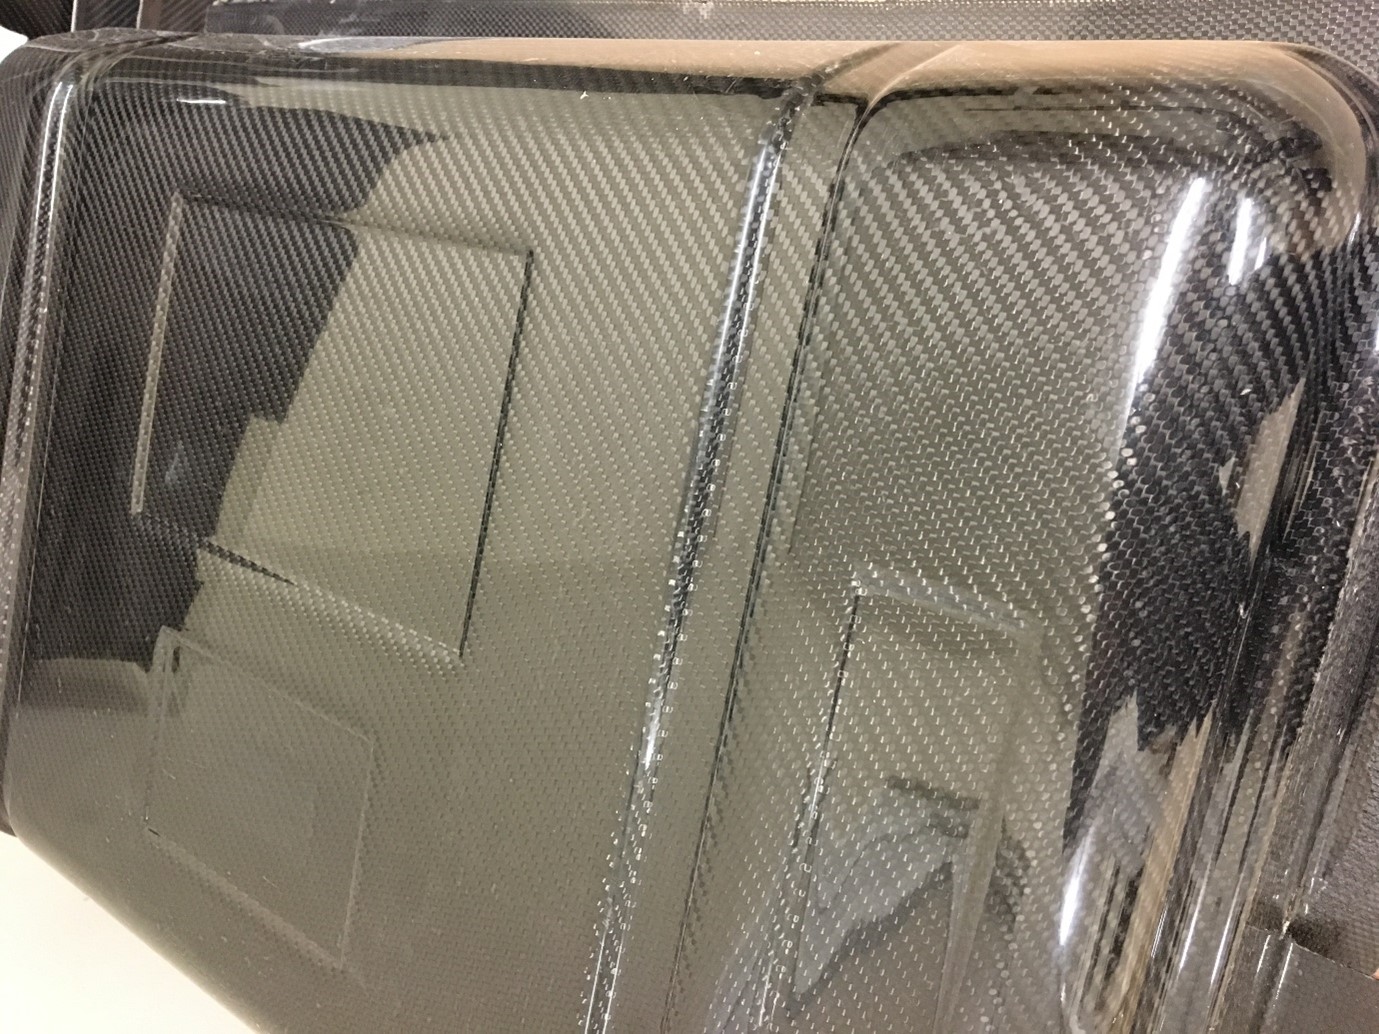
Hopefully all being well you should end up with a good cosmetic part as above Remember however that this process does take practice.
Below are Product links to all vacuum consumables used in this guide. This excludes composite materials such as carbon as this will depend on your chosen materials for your final composite:-
Infuply 2 https://www.ecfibreglasssupplies.co.uk/product/infuply-2
Breather fabric https://www.ecfibreglasssupplies.co.uk/product/polyester-breather-fabric-100mm-4-wide
Infusion wrap https://www.ecfibreglasssupplies.co.uk/product/white-polyethylene-infusion-wrap
Infusion hose https://www.ecfibreglasssupplies.co.uk/product/clear-polyethylene-infusion-hose-6mm
Catch pot https://www.ecfibreglasssupplies.co.uk/product/resin-catch-pot
Vacuum pump and oil (we used the CC31 in this guide) https://www.ecfibreglasssupplies.co.uk/search?searchterm=vacuum+pump
PTFE release fabric https://www.ecfibreglasssupplies.co.uk/product/ptfe-release-fabric-1-metre-wide
Flash tape https://www.ecfibreglasssupplies.co.uk/product/flashtape-1-25mm-wide
Low temp Sealing tape https://www.ecfibreglasssupplies.co.uk/product/low-temperature-sealing-tape
Infusion Braid (colour may vary to that shown in guide) https://www.ecfibreglasssupplies.co.uk/product/orange-polyethylene-infusion-braid
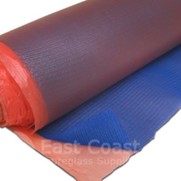
Vacuum bag https://www.ecfibreglasssupplies.co.uk/product/50-micron-vacuum-bag-film-15-mt-wide-tube
Line clamp https://www.ecfibreglasssupplies.co.uk/product/mti-squeezee-clamp
‘Y’ Piece https://www.ecfibreglasssupplies.co.uk/product/vacuum-y-piece-6mm-od
‘T’piece https://www.ecfibreglasssupplies.co.uk/product/vacuum-t-piece-6mm-od
Leaks in your vac bagging system
This section of the Guide focuses on getting a perfect seal on a vacuum bag and troubleshooting the problem.
Leaks in a vacuum bag can be very time consuming and frustrating. getting that perfect seal can be sometimes difficult. So, in this guide we are going to be looking at all the reasons why you might get a leak in your vac bag set up, how to check the quality of the seal or the integrity of the seal on a vacuum bag and then finally how to identify and fix any leaks that may be present.
what are the main causes of leaks in vacuum bags?
It can be caused by several reasons: Firstly you might have a leak in the bag before you even begin, or you may have done an improper job of making up the perimeter seal using the sealing tape. It is also possible to get leaks that occur during the vacuum bagging process and handling the materials at that stage, and worst case scenario you may even get bags that will burst or puncture during the cure and then finally it is always possible that a drop in pressure will be caused by a leak somewhere else in your vacuum system so let's address that first point:
1. Having a leak in your film before you even start
It is vitally important that you do use high quality materials that are specifically designed for vacuum bagging. We supply a few vacuum bagging films within our range : vacuum bagging our 50 MICRON VACUUM BAG FILM - 1.5 MT WIDE TUBE being most popular film and it has become standard within the industry. If you do have a leak in your bag, it could be caused by the way that you've stored it. Ideally vac bag film should be stored on a dedicated storage rack where it will be safe from getting damaged. However, it will be fine to wrap these materials back up in the bubble wrap and packaging that we send it in when not in the store them safely on a shelf.
2. Perimeter seal
Cut your film slightly larger than the part to allow the film to pleat and follow all the contours in your mould without having to stretch the bag and so it doesn’t put strain on the seal.If you have pleats or folds in the bag around the perimeter, make sure that the sealing tape goes all around the inside of the pleats edge and double back on the corners and give it a good pinch. Look at the sealing tape through the film, you shouldn’t see any air pockets or bubbles, if you do then press firmly until they disappear.We would advise putting the tape around the perimeter of the mould unless you are doing a small part that can fit inside the vacuum bag in which case you only have to worry about sealing the ends of the vac film if you are using a bagging tube.
When applying the tape around the perimeter, leave the backing film on the tape to stop stray fibers sticking to the tape as these will also cause leaks. The sealing tape should be kept clean just before pressing the vac bag into place. Carefully peel the backing from the seal a short section at a time the tops of the pleats are one of the most common places to get leaks so do pay attention here and ensure that the film is making good contact with the tape . have a good inspection to ensure you have a properly sealed vacuum bag. You can even carry out a dry test before infusing any resin.
3. Drop in pressure caused by system failure.
Having a good seal around your mould and a good quality bag will not help if air is being introduced from elsewhere in your vacuum system.
If you're using a quick release coupling you need to ensure that all the threads where hose tails etc screw in place are sealed with a ptfe sealant tape or a suitable thread sealing compound check that any ‘o’ rings or rubber washers are not damaged and replace any that are.
Also check your hosetail fitting and where necessary secure them with jubilee clips. You can also use the knead together the sealing tape to create a putty that can be squeezed around any fittings for an extra precaution.
Also do dry tests on your pumps, catch pots etc and ensure the pressure dials are reading full pressure before attaching to any hoses.
As mentioned earlier carry out a dry run and check the pressure gauges. If you are losing pressure start from the pump. Clamp off the vac line coming from the pump and if you see the pressure gauge on the pump rise then you know all is good at this stage.Start to go around your parameter line step by step pressing firmly all around the sealing tape, stretch out any small creases that you may find along the way as tiny creases in the bag can cause leaks.Check your breach unit then inspect the catch pot by clamping off the line between the bag and the catch pot.A good indication that you have a good vacuum is that the pump should have just a gentle purr to its sound, if it is noisy and letting out exhaust fumes then this indicates that the pump is overworking and that the seal is not good enough. As you inspect you may here the pump change pitch which will give you a clue whether you’ve found the affected area.
This advice and information is given in good faith for guidance only. and is given without warranty, users should determine information given and using their own judgment to determine suitability.
To reassure our customers - all materials supplied by East Coast Fibreglass Supplies are of the finest quality, manufactured by companies such as Scott Bader, DSM, Owens Corning to name but a few, who all have supplied materials into the Composites industry for many years on a global scale. Samples from every batch manufactured are retained for testing, should the need arise.